
The Room Server is the application which is responsible for the following functionality:
The room service gets all required parameters through the Room Server.
The first time you start the application, you need to go through the installation wizard to select the Conference system type, upload the license and select the database. After installation, you can still access the wizard at any time, for example when you need to make a change to the server configuration. To open the wizard, you need to start the Room Server in administrator mode.
In this screen you can select the properties of the connection with the Plixus Engine. Select your conference system from the list in the drop down menu.
The Room Server communicates with Plixus Core. This connection goes over a standard LAN-connection using the TCP/IP protocol. Parameters include:
It is mandatory to click the Test Connection button. CoCon will then try to connect to Plixus Core and retrieve the correct room ID. (You can cancel the test if it takes too long). There are two possible outcomes:
After the “Test connection” the “Next” button becomes active.
The license mechanism for CoCon depends on the hardware you’re connecting to.
To add a license on Plixus Multimedia, perform the following actions:
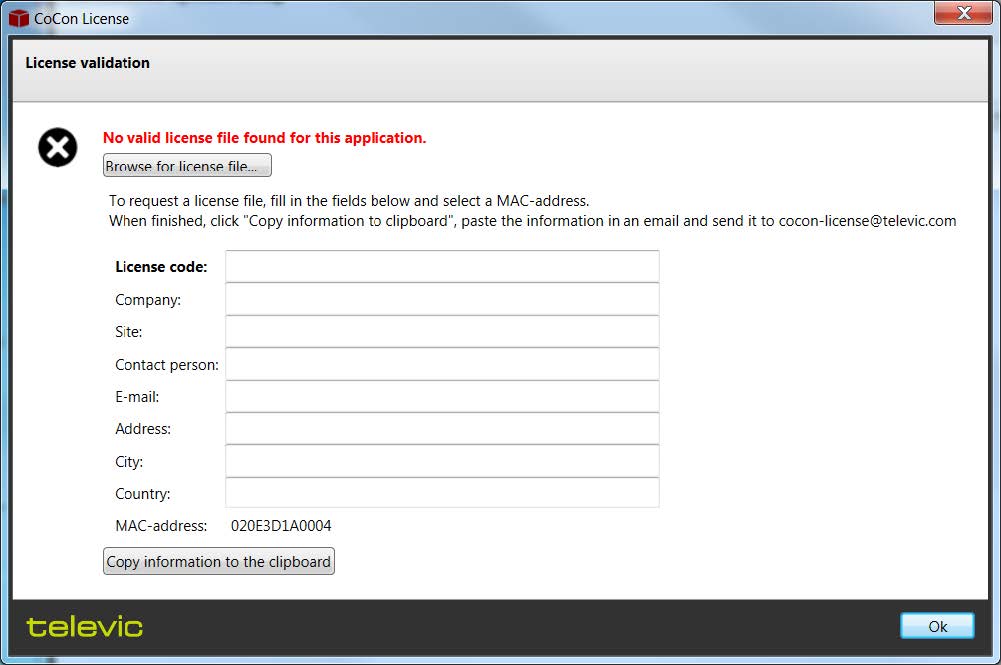
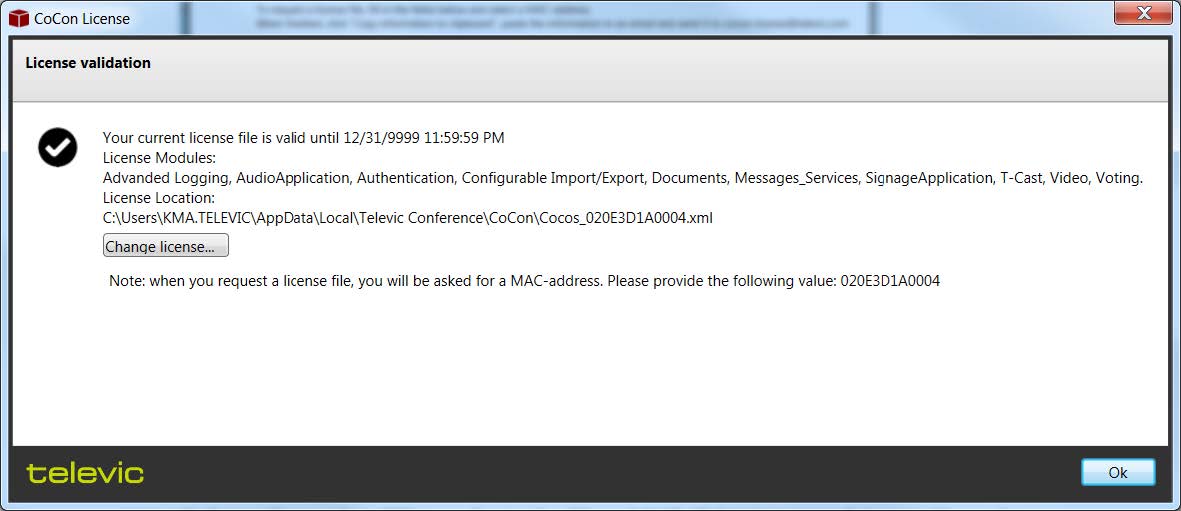
In this window you can see the MAC address of the device. This is the same MAC address as the one on the back of the engine.
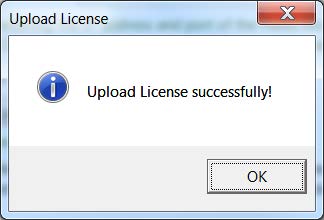
CoCon now transfers the license via FTP to the Plixus engine. If this is successful, the following message appears:
If the transfer failed, a message appear. A possible reason for this failure, is your firewall. Therefore, switch off Windows Firewall, your virus scanner’s firewall and Windows Defender.
For advanced transfer of license file, we refer to the CoCon Advanced Installation document which you can find in the Help folder of the CoCon installation directory.
You can also upload your license file on the Plixus web server. Surf to the IP address of your Plixus engine and go to the System info page ![]() . Click Upload license and browse to locate your license file.
. Click Upload license and browse to locate your license file.
The next steps in the configuration wizard allows you to choose, create and/or update the database that CoCon uses to store its data.
During installation of the SQL Server Express (the database that CoCon uses to store its data), a check is done whether the Computer Name is the same as the User Name. This is a situation which is considered bad practice in IT terms, and does not allow the successful completion of the SQL Server installation procedure. To solve this, stop the CoCon Room Server (using Task Manager which you can access by pressing CTRL + ALT + DEL), change either the Computer Name or the User Name and restart the CoCon Room Server.
This step detects any databases that are already present or can be used to run CoCon on. The first step lets you choose between automatic detection and manual setup. The default option is selected, this shows a screen, where the CoCon Server is looking for usable database servers.
When you select the manual setup of the database, you need to define:

If no usable database is found, CoCon will recommend creating a new database; as shown in the following screen:

The following paragraphs describe two possibilities in this situation.
Sometimes the automatic installation of the database fails. If this happens you should manually install the SQL database. In the document Advanced CoCon installation which you can find in the Help folder of the CoCon installation directory, you can find an explanation on how to do this.
In this situation, CoCon found a usable database. CoCon will use this database to store its data.
Occasionally, the CoCon database will need to be updated. You will be notified of this, using a special wizard step. The update procedure will take some time, but no data will be lost.

If you would run through the configuration again and the database is configured correctly, you will see the following screen.

Click Change database (advanced) to change the database, using the steps described in the previous sections. If you click the button and then keep the current settings by clicking Next, you will see the following screen:
![]()
If you click Clear this database, all the information in the current database is deleted, so that you can start with a new empty database.
On this page you can select the room. Different options are possible: you can create a new room, or connect to an existing room. If you select an option, the wizard then shows what the result is in bold.

In the last step of the Room Configuration wizard, you can set some advanced settings. The available options depend on the type of central unit you are using, and the enabled license option. The following settings are available