
With the Operator Application you can view, edit and control the agenda of the active meeting (if one is available). To view the meeting agenda, click the Agenda tab on the left.
You can identify the status of an agenda item by the icon on the right of the item:
To edit an item, double click on agenda item. The options are similar to the those described here "Configure voting agenda items" on page 1. It is important to click Save after every change. If you don't, the change will only be available locally, and not on the Server, any of the other connected client applications or the interactive delegate units.
It is also important to know the difference between a selected and an activated agenda item:
Figure 1-41 The Agenda view in the Operator Application. Icons indicate active (arrow) and finished (check mark) agenda items.
In almost every ribbon, you have an Agenda section with the controls:
An agenda item can have different state, these are indicated by an icon:
As discussed in "Configure voting agenda items" on page 1, CoCon provides Voting Templates to simplify the configuration of voting settings that are regularly used. To save voting settings as a template, click Save Voting Template in the upper right corner of a voting item. The template automatically gets the current title as the template name (with the string “_Template” added).
If you want to use a voting template, there are two possibilities:
You can configure a voting template by clicking the green arrow on the bottom of the agenda view. Select the template you want to edit from the dropdown menu on the left. Or click New to create a new template with a user-specified name. After you click Save, you can use this template for your voting items. For more information on the configuration of voting items see "Configure voting agenda items" on page 1.
When the agenda item is a voting topic, the Voting ribbon becomes available. This ribbon contains functions relating to voting. The following section will describe all functions provided here.
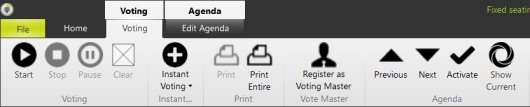
Figure 1-42 Voting ribbon
Note that the last three buttons are general buttons, available on almost all the ribbons. They are described in "Agenda navigation" .
To start the voting, click Start. When the voting is completed you can click Stop to finish the voting session. There is also an option to pause or restart the voting.
After you click stop, you can Clear the results. This does not delete the results, only disable the display of the results in the Operator Application and Signage application. If you wants to show the results again, then click Retrieve Results. The Signage and Operator Application then show the voting results.
If a voting is started where a presence check is required (see "Quorum tab" on page 1), a message appears in the agenda overview. On the delegate units the is 0 - vote LED blink. By pressing the 0 - vote button, you confirm your presence. If the required number of people have confirmed, the voting can start. If the presence is checked using badges a message will appear if not enough people are present.
When the voting is stopped, and there is a hung vote (=a number of voting options have the same number of votes), there are some possibilities depending on the hung vote options. One of the possibilities is that the voting immediately restarts. Or a popup message can appear so the operator decides what the outcome must be. All options are described in "Hung vote tab" on page 1.
This function allows you to quickly start a voting session. When you click the button, you get a list with all the voting templates that are currently available. Select on one of these voting templates to create a new voting agenda item based on the settings contained in the voting template. The following events take place:
After you created the item, simply click Start to start the newly created voting session. If desired, the operator can still change the voting settings (e.g. title or voting options), save the item and then start it.
There are two printing options, if you select Print Entire, this generates a printable PDF of the complete agenda with:
In the preview the following options are available:
The Print button is only available if the voting is finished. This gives a printable PDF of the results of the last voting. Similar functions as described above are available.
If you click Register as Voting Master, then the Operator Application running on this PC is the only one who can control the voting session. There can only be one vote master in the system, meaning that Operator Applications from other PCs are not able to control the voting.