_280x251.png)
_278x251.png)
Click + New meeting to add a new meeting. For every new meeting you have to specify the following parameters:
Figure 1-86 Popup to add a new meeting in the Nameplate application
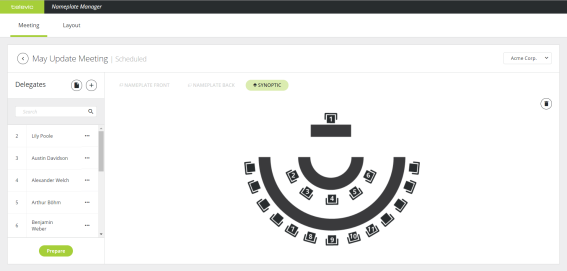
Below you can find a general description of the different elements available on the meeting editor page.
_578x286.png)
Figure 1-87 General layout of the meeting editor
To see the position of the seats and the Nameplates in your room, you can add an image of your synoptic. You could use an image of the synoptics you created in CoCon Room Configurator.
If you did not add delegates to your meeting upon creation or want to add additional delegates, you can do this is on the meeting editor page of the Nameplate Manager. There are two ways to add delegates: using a file or adding them manually one by one.
However, it is possible to have delegates with the same name in the database if you add delegates manually (see "Add delegates manually" on page 1).
It is possible to import multiple delegates at once. Upload an Excel file containing all delegate information.
Click ![]() and drag and drop the file or click Upload and select your file. Click Confirm.
and drag and drop the file or click Upload and select your file. Click Confirm.

Figure 1-88 Popup window to import delegates using an Excel file
To add single delegates manually click ![]() . Complete the delegate details and click Confirm.
. Complete the delegate details and click Confirm.
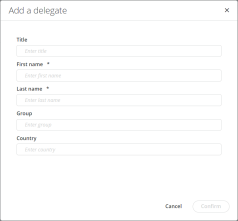
Figure 1-89 Popup window to manually add delegates
To be able to display the correct content on the proper nameplate, you need to link a delegate to a specific seat. On a seat you can find a delegate unit, a nameplate or both. In the last case you need CoCon Meeting Manager to update the delegate database. For more information on how to configure this see "Link Nameplates to units" on page 1. To link a delegate unit with a nameplate you can also use the USB connection, for more information see "Use nameplate with USB connection" on page 1.
Per delegate it is possible to change the layout of the Nameplate and create custom layouts if needed. For a detailed description on how to configure the layout of the Nameplate see "Configure Nameplate layout" on page 1.
Assign seats: All delegates without seats are displayed in the list Delegates with no seat, these are shown in gray and are preceded by #. To assign a seat to a delegate click the more options icon ![]() and select Assign seat. Select one of the available seats from the drop-down menu and click Assign.
and select Assign seat. Select one of the available seats from the drop-down menu and click Assign.
Switch seats: Sometimes delegates switch seats in the meeting room. To support this and adjust the nameplate accordingly, you can switch seats in the application. Click the more options icon ![]() and select Switch seat. Select the seat you want to switch with and click Switch. Click Publish all to publish these changes to the nameplate.
and select Switch seat. Select the seat you want to switch with and click Switch. Click Publish all to publish these changes to the nameplate.
Remove seats: To remove the seat from a delegate click the more options icon and select Remove seat.
Remove delegates: To remove the delegate click ![]() and select Delete. This removes the delegate from the meeting, but not from the database.
and select Delete. This removes the delegate from the meeting, but not from the database.
In some cases it makes sense to deviate from the predefined layout, for example when the name of the delegate is very long and cannot fit onto the display using the configured font size. In this case you could change the font size of only that delegate's nameplate.
You can change the layout in the editor on the meeting editor page the same way as described in "Configure Nameplate layout" on page 1. Custom layouts are indicated by a green circle.

Figure 1-90 How to make custom layouts
Depending on the status of your meeting, there are two options to save your layout:
Click Reset to meeting layout to undo all customizations.