Mount the Confidea WCAP
POSITION THE CONFIDEA WCAP
- Do not place the WCAP behind obstacles such as walls, cabinets, panels, projection screen, glass screens etc. These objects can significantly reduce RF signal strength as well as quality.
- Antennas should not be placed above suspended ceilings as this can cause unnecessary reflections and signal attenuation.
- Power cables, cable trays and electric machinery can also influence the signal of the antennas.
- Do not put antennas in metal cable trays or metal shelves as this will significantly reduce the signal quality.
- Microwave ovens and Bluetooth devices may cause intermittent interference in the 2.4 GHZ range, this is why we recommend the 5 GHz range.
- Avoid mounting the WCAP on a pillar since this will cause signal “shadows”, which are areas with reduced or no signal reception.
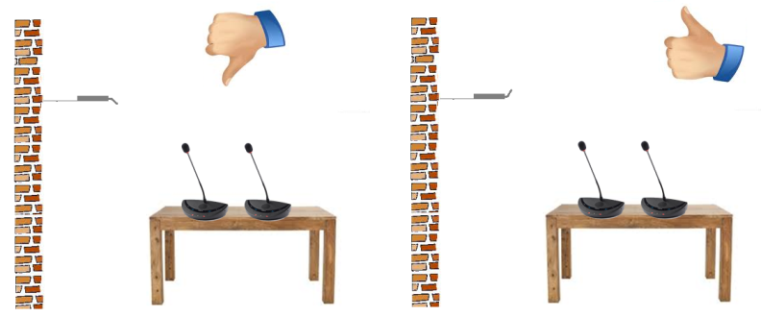
The images below show how to position the WCAP correctly.
_442x209.png)
_423x217.png)
Figure 1-11 How to position a WCAP in relation to a wall or ceiling
OPTIMIZE POSITION OF THE WCAP ANTENNAS
- When the antennas of the WCAP are positioned very close to a wall or ceiling, this may result in absorption of the RF signal , which can decrease RF signal quality.
- It is important not to point the antennas directly towards the units.
- The angle of the antennas in relation to the position of the delegate units affects the overall RF link quality between WCAP and delegate units. See the images below for more information.
_541x224.png)
_556x208.png)
Figure 1-12 How to position the antennas of the Confidea WCAP
MAXIMUM RANGE OF THE WCAP
A single WCAP has a range of 30 m in “open field". However, the maximum range can depend less on the position of the WCAP by positioning the antennas in relation to the position of the delegate units. The frequency used also has an effect on the range of the WCAP. The range decreases gradually for the highest 5 RF bands, with a minimal range of 25 m (in optimal conditions)
To extend the range of the WCAP you can couple several WCAPs to a Plixus engine. By using multiple WCAPs you are able to connect to much more units spread out over the entire meeting room. For more information on Plixus and how to connect both system see the Plixus installation and user guide.
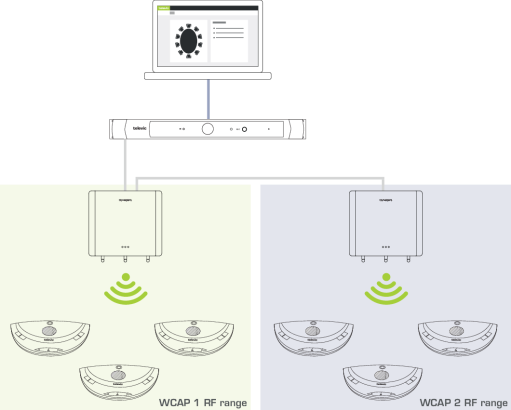
Figure 1-13 How to extend the range by coupling multiple WCAPs to a Plixus ssytem
Certain construction materials such as concrete or metal may absorb part of the RF signal radiation, resulting in a reduction of the maximum distance between the access point and the units.
INSTALLING THE CONFIDEA WCAP
- Plug in the 24V adapter to the device and the power socket.
- Connect the LAN cable to your computer or the LAN network that contains your computer.
- Switch on the Confidea G3. The left LED light will start blinking white, this means the system is booting.
- When the LED light turns green, the device is active.
When the light does not turn green or turns red, please contact your local support team.