Plixus MME
Overview
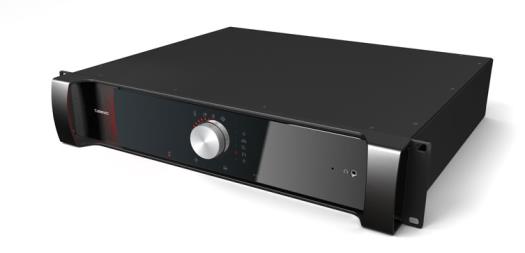
Figure 1-3 CoCon MME front view
The CoCon Multimedia Engine is the heart of the Plixus system. It controls all delegate units and interconnects to other systems either via the external audio connections or control ports (camera control, Dante, central software, API).
The central unit can drive a maximum of 80 CoCon units directly from the engine. In case a large number of units are required, the system can be extended with multiple CoCon Network Extenders.
Control dial functionality
The front of the Plixus MME has a Jog Wheel with the following options:
- Push the dial to select a Level 1 setting
- Turn the dial to select a Level 2 setting
The following table details the control dial options:

|
0 to max |
Loudspeaker volume |

|


|
Microphone mode: Direct access
Microphone mode: Request
Microphone mode: VoX
Microphone mode: Group
|

|
0 to 8 |
Maximum number of open microphones |

|
0 to max |
CoCon MME headphone volume |
Additional icons are displayed to indicate different states:
 indicates that CoCon server is connected to the Plixus Multimedia Engine
 indicates an error state.
 indicates a Master/Slave setup.
 Control button key lock activation/deactivation. Press and hold control dial for 5 sec.
You can still browse through the settings when locked.
Control button key lock activation/deactivation. Press and hold control dial for 5 sec.
You can still browse through the settings when locked.
Rear connectivity
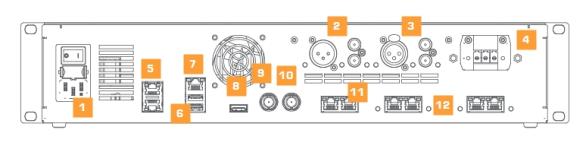
Figure 1-4 CoCon MME rear view
The rear of the Plixus MME has the following connectivity options:
- AC power inlet & fuse holder
- Balanced (XLR) and two unbalanced (RCA) audio outputs
- Balanced and (XLR) two unbalanced (RCA) audio inputs
- 48 V power output (400 W)
- Two redundant DANTE™ network ports
- Two USB 2.0 ports (for future use)
- IP configuration port (LAN)
- Digital video output (HDMI) (for future usage)
- SDI video input
- SDI video output
- Two back bone conference network ports that are not powered (for future use)
- Four powered CoCon conference network ports
Dante™ interface
The optional Dante™ card should be installed as follows:
- Make sure the Dante card connectors face the top and put the card in under a 45° angle.
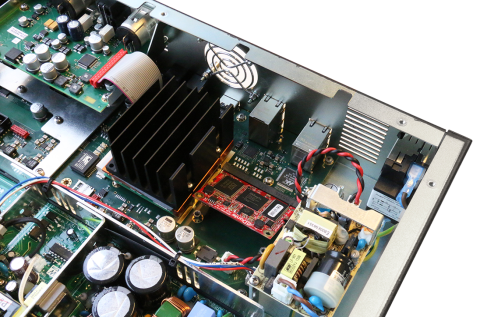
- Press the card down and secure it with two screws, one at each corner of the card.
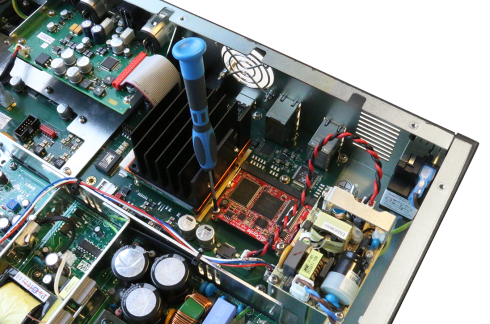
Please switch off power before inserting the DANTE™ card into the Plixus MME/AE-R.
Open the cover of the central unit and insert the card in the position as indicated in the picture. Fix the Dante™ card by means of two screws and put the cover back on the central unit.
Supported Video Formats
| SD SDI |
 PAL PAL
NTSC
|
| HD SDI |
720p: 23.976, 24, 25, 29.97, 30, 50, 59.94 and 60 Hz
1080p: 23.976, 24, 25, 29.97 and 30 Hz
1080i: 50, 59.94 and 60 Hz
|
| 3G SDI |
1080p: 50, 59.94 and 60 Hz |
Factory defaults restore button
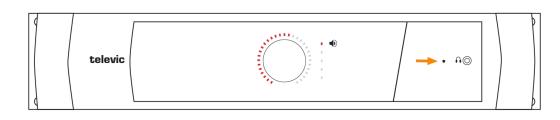
Figure 1-5 Reset button on CoCon MME
Depending on the amount of seconds you press and hold the reset button, different outcomes are possible:
- Press and hold the button for less than 5 seconds: the units will restart.
- Press and hold the button for 5 up to 20 seconds: the IP address resets to the default IP address and the unit restarts. This is indicated by the blinking LED lights of the unit.
- Press and hold the button for more than 20 seconds: configurations are not cleared, but inactivated, IP address is reset to the default IP address and the unit restarts. This is indicated by the continiously lit LED lights.