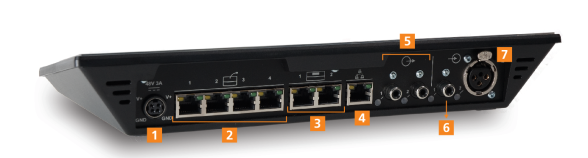
The D-Cerno CU is the heart of the system. It controls all delegate units and can interconnect to other systems via the external audio connections.
The system operates in a standalone mode and controls a maximum of 50 units. Configuration can be done via the integrated menu.
All controls are done via touch panel by means of an intuitive user interface menu (see "Introduction to the main menu" on page 1). A user can activate or select a control or menu item by touching one of the symbols underneath the display.
Figure 1-6 Connections available on the back side of the CoCon central unit
In case a larger number of units are required the system can be extended with 2 extra central units in master / slave configuration. The maximum of microphone units is 150 (obtained by using 3 central units).
Through the LAN connector it is possible to connect the central unit to the local network. This makes it possible to control the recording and configuration by web browser on your PC or mobile device.
The AUX In connection on the central unit has an XLR 3 Female connector. So a cable with an XLR 3 Male connector should be used to insert an external signal.

Figure 1-7 XLR pin assignment: Pin 1: Shield, Pin 2: Signal 2, Pin 3: Signal -
The USB memory sticks have to be formatted with the FAT file system. NTFS is not supported by the D-Cerno CUR. To guarantee a correct recording we advise to use USB 2.0.
To start the D-Cerno CUR there are two options. The first option is to press and hold the on/off button for 3 seconds. A second option is to automatically let the D-Cerno CUR start when the power supply is connected. For this option you need to physically change a dipswitch on the electronic circuitry inside the D-Cerno CUR. This procedure is described in the appendix of this manual in "D-Cerno CUR startup options" on page 1.
When the red ON/OFF led is blinking the meeting can be started and settings can be adjusted. USB and network functionalities (recording, web browser) are available after 15 seconds, when the red ON/OFF stops blinking and turns off.
Then the image depicted on Figure 1-8 appears on the screen and the device is ready to record.
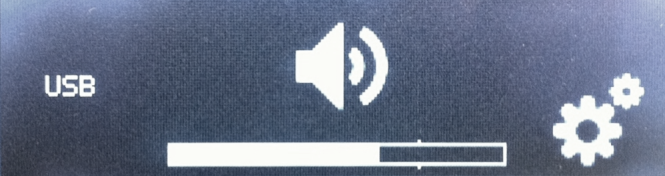
Figure 1-8 USB and network functionalities enabled
To switch off the device, press and hold the ON/OFF switch for 3 seconds.