Initialization
Introduction
The CoCon system always works with seats. A seat is a conceptual name for a unit or a group of units which are combined on that seat. By default this is a one-to-one mapping, so every unit has one seat. However, there can be more advanced cases where units are manually combined on a seat. During initialization you can assigns units to seats.
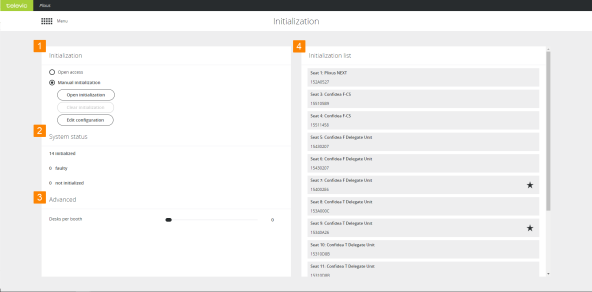
Figure 1-58 Initialization page
- In Initialization on the left side of the page you select the mode of initialization.
- System status shows the status of all units, you can see the amount of initialized, faulty and not initialized units. Faulty units are units that were initialized, but are now missing. Not initialized units are connected, but not yet initialized.
- In the Advanced settings you can define the maximum number of desk per booth (for interpretation).
- The Initialization list on the right side shows all unitialized units, per unit you can see the following information:
- Seat number: position of the unit in the meeting room
- Unit type
- Chairman capabilities: can unit acts as chairperson, indicated by star icon.
- Serial number: of the unit
- Booths: all available booths together with the amount of desk per booth and the units.
- See if Intercom is active
How to initialize units
There are two initialization modes possible: Open access and Manual initialization.
Open access
- This is the default mode. The main purpose of this mode is to provide a quick way to set up and/or test the system.
- Seats are automatically assigned to the units after startup. Assigning seats is done according to the cabling topology of the units. This means that seat one is assigned to the first unit at port one of the CoCon engine.
- For network extenders connected to the CoCon port, seats will also start with port one of the network extender. The system automatically discovers the redundant loops.
- Interpreter desks are automatically divided into booths according to the setting Number of desk per booth, under Advanced settings.
- Upon restart of the CoCon engine (or CoCon Core) in Open Access, the network will be rescanned and seats and desks will be assigned accordingly.
- In Open Access mode, it is not possible to edit the configuration of the units (seat number or delegate/chairperson priority), nor change the configuration of the booths.
- When changing from Open access to Manual Initialization, the initialization and seat order is preserved.
Manual initialization
- Use Manual initialization when you want to define which unit is assigned to which seat number. This can be important when using camera tracking as well as CoCon seat allocation. Manual initialization allows you to edit the configuration in terms of chairperson / delegate priority and booth configuration after initial configuration.
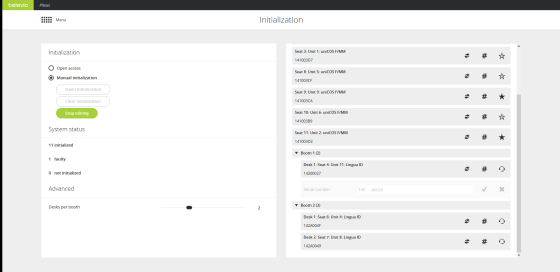
- Click Open initialization to start the initialization phase. This causes uninitialized microphones to blink red and initialized microphones to blink green. Add units to the initialization list by pressing the microphone button. During manual initialization you can perform the following actions on the units:
-
 : click to swap unit. When a unit is faulty, it will be greyed out in the web server. Click the icon and enter the serial number of the new unit. Click the checkmark icon
  to confirm. Note that you can only replace units with units of the same type.
-
 : click to modify the seat number. If you do this during the initialization, the next assigned unit number will be the highest unit number + 1.
-
 : click to remove individual units during initialization. After removal the microphone LED will blink red again.
It might take several seconds before the microphones start to blink when you click Open initialization.
You can only manual initialize units with a microphone button. Units without this button (e.g. Confidea channel selector) are automatically assigned to a seat.
- Click Stop initialization to finish and the seats are automatically assigned to the units. Stopping initialization might take a while, up to one moment depending on the number of units. The seat number will automatically map to the unit number and the Lingua ID’s to desks in booths according to the setting Desk per booth.
- Click Edit configuration to change the following settings
- Edit the label of the unit or booth: click the edit icon
 to change the label of the unit or booth.
- Swap units
 :see "Hot swap procedure" for more information.
- Change seat number: click the icon , specify the seat number and confirm.
Do not reload the page when editing the configuration.
Do not change properties during meetings, because this can disturb your meeting.
You can also use CoCon to configure different settings such as the priority of the unit.
- Click Clear initialization to clear the initialization list, as consequence all units will start to blink red. It is only possible to clear initialization when the initialization is open and units are not faulty. Confirm to finish clearing the initialization.
Hot swap procedure
Sometimes you need to swap two or more units in your CoCon setup, for example when you have a faulty unit. In CoCon it is possible to swap these units without the need to reinitialize all units. Follow the procedure described below to swap units:
Please note that you can also swap units of the same type and the new units should have the same software and firmware versions as the unit you are replacing.
- Go to Initialization in the Main menu. When a unit is defective, this item will be greyed out in the initialization list.
- Click Edit configuration, units will not be reinitialized when you select this option.
- Click the swap icon .
- Fill in the serial number of the unit you want to swap with, the three first numbers are already completed. (you can find the serial number of the unit on the bottom of the device). It is best to check that you are replacing the correct unit by checking the serial number of the faulty device with the one present in the CoCon web server.
- Click to confirm the change.
- Now in change the defective unit with the new one in your CoCon network. Once CoCon detects the new unit, it will no longer be greyed out.
Activate Dante on seat
Some setups use a wireless microphone to allow people in the audience to ask questions. As chairperson, you want to be able to control this microphone. For this use case you need Dante. In the CoCon web server you can give discussion capabilities to a Dante input. This input then becomes available in the operator view, where you can manage the microphone activity.
Assign discussion capabilities to Dante input
To visualize all Dante channels, click the filter icon  next to Initialization list and select Show Dante Channels. You can recognize Dante input channels by their seat number, it has the format: 600XX. Dante output channels have the format 610XX.
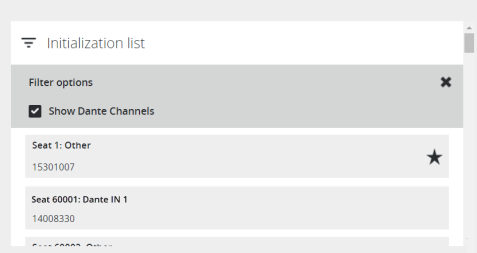
Figure 1-59 How to visualize Dante channels in the CoCon web server
To assign discussion capabilities to a Dante channel, click Edit configuration and then click the microphone icon  next to the Dante channel. When discussion capabilities are active, the icon changes to
  . To remove the discussion capabilities, click the icon again.

Figure 1-60 Possible actions for Dante channels during Edit configuration on the Initialization page of the web server
If you activate the discussion capabilities of a Dante channel, CoCon treats this seat the same as any other seat with a discussion unit. This means that you can manage the microphone activity using the Operator page. In CoCon this unit is also visible, there you can drag the unit onto the synoptic in the Room Configurator application.
Put Dante input and output on the same seat
When your conference system contains a thrid party microphone and speaker, you need to link these on the same seat. To link the Dante input and output, change the seat number of the output to the seat number of the input. The input and output are now treated as one.
Combine Dante with intercom
If you want to initiate an intercom call from a seat with a Dante input to another unit, you need to create an API call. Other units such as the uniCOS and Lingua ID units can use their interface to initiate an intercom call with this seat.