Synoptic view
In the synoptic view you can monitor and control the meeting activity on the actual synoptic. Here you see the image of the synoptic as configured in the CoCon Room Configurator (see "Edit Synoptics" on page 1). A synoptic contains the following elements:
- Nodes: locations where no conference equipment is associated (you can edit nodes in the Plixus web server)
- Seats: conference units in the room that can be controlled (unit are initialized in the Plixus web server). E.g. microphones, voting panels…
The example below contains an image background with 12 seats, each with 1 microphone unit that can be controlled
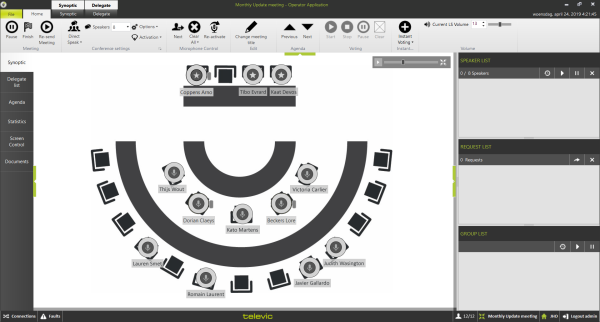
Figure 1-33 The synoptic view in the CoCon Operator application
Synoptic ribbon
When you select the synoptic tab, an additional ribbon becomes available. You can access this functionality by clicking the Synoptic button in the application header. You can find the following functionality in this ribbon:
- Zoom to fit: resizes the names of the delegates to make them completely visible.
- Hide badge: In the synoptic view, units with badge reader are shown with a small rectangle (gray, green or red depending if the badge is present or not). Click Hide badge if you do not want to show this.
- Show Voting Synoptic / Show Microphone Synoptic: during a voting session, you can change the view of the synoptic to show the voting status or the microphone status.
- Delegate seats: choose which delegate information to show in the synoptic view.
Seat control
In the synoptic you can control different settings such as the activity of the seats. CoCon uses a color code for the activity of the seat:
- Red: microphone is active and a delegate can speak. Switch the microphone on and off by clicking on a unit (if no other constraints are active regarding the microphone management, see "General Meeting settings" on page 1) or right-click on the unit and select Activate.
- Green: microphone is in request; a delegate cannot speak but has shown the intention of wanting to speak. To switch on the request mode, right-clicking on the unit and select Request on.
- Yellow: the unit is reported as broken by the CU. No microphone activity is possible.
Zoom control
In the upper right corner of the synoptic there are some zoom controls to allow you to see the information you need, especially when you have a very large synoptic:

- Click the arrow on the left to open or close a mini-map of your synoptic.
- Use the slider to zoom in and out.
- Click the icon on the right to zoom to fit.
Actions on seats
When you right click on a seat different functions are available. The available functions depend on the conference settings you set previously.
- Activate / Deactivate microphone
- Request on / Request off: put microphone in request or out of request
- Reset Display: resets the display of a uniCOS unit when the does not show the expected display behavior. The display will then reset and reboot after a few seconds.
- Service Management: If the delegate sits on a seat with a multimedia unit and selected a service, you can manage the Services here. You can see the different services the delegate requested. If you click on a service, you indicate that the service is being handled, and the multimedia unit of the delegate displays this.
- Sensitivity offset (dB): change the individual sensitivity of the delegate microphone. In this way, you can change the input volume of the audio signal being picked up by the microphone. You can control the individual sensitivity in the following way:
- Remove user from seat: removes a delegate from his seat. This can be done for different reasons:
- Remove the delegate from the meeting
- Position another delegate on that seat
- Change properties of a delegate (so put a new delegate on that seat)
- Make chairman / delegate: make somebody else chairman or delegate during the duration of the meeting.
- Make Vip: A VIP profile is a special delegate status , VIPs have the same speech priority as a chairman, but without the prior/next and start/stop vote functionality
Different functions are also possible on the Operator page of the Plixus web server. For example changing the priority of a participant and managing the microphone status. See Plixus manual for more information.
Speaker and request list
On the right side of the Operator Application you can find the Speaker List and Request List. Here you can see which participants are speaking or requesting to speak. If speech timers are active and configured, you can also see the remaining speech time here.
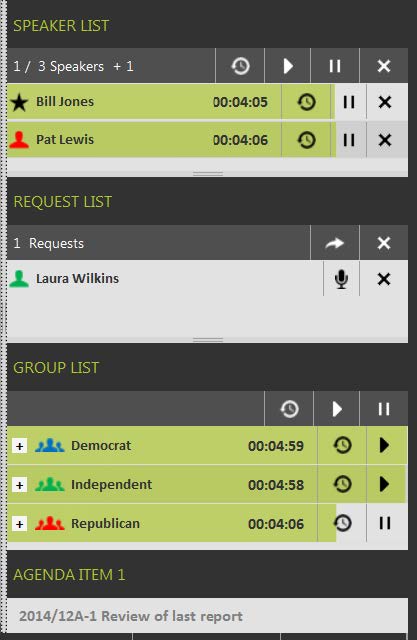
Figure 1-34 Operator Application speaker and request list with delegate speech timers
In the example above, you can see that with the configured conference settings, currently 1 of the 3 speakers is allowed to speak (See "General Meeting settings" on page 1). Additionally, one chairman microphone is active (+1). You can deactivate a microphone by clicking the "x" next to the speaker.
A chairmen can always activate their microphones on top of the number of allowed microphones.
In the header of the speaker list you can find some extra controls for speech timers (these controls are also available for every delegate separately):
- Reset: This resets all delegate speech timers.
- Play: This starts the delegate speech timers, starting from their previous point.
- Pause: Pauses all delegate speech timers.
CoCon displays speech timers as green progress bars in the background of all speaking delegates. This indicates how much time they have remaining. If you configured the Time before exceed, then the progress bar color changes to orange for the last part of the allowed speech time.
Below the Speaker list you can find the Request list. To activate the microphone of the first person in the request list, click the arrow icon on the request list header. You can also activate the microphone by clicking the microphone icon next to the delegate name. If there is a slot available in the speaker list, the seat moves here and becomes active. You can move delegates from the speaker list to the request list, simply by dragging and dropping them to the other list.
Group list
Below the speaker and request list you can find the Group list. If delegates are part of a group, this list shows all of these groups. The list shows the various groups are present in the meeting. Click the + in front of the group to see which delegates are present of this group in the meeting. When group timers are active, you can see the remaining speech time as a green progress bar. The controls for the speech timers are the same as described in "Speaker and request list" on page 1.
Additional Speech timer indications
If additional timers are active, these are visible in the bottom right corner of the synoptic screen. An agenda item timer shows the remaining speech time of the active agenda item. Two controls are available: reset and pause. The meeting timer is the timer for the complete meeting. It also has two controls.
Active agenda item
In the bottom right corner of the synoptic view, you can see which agenda item is currently active.
Voting result statistics
When a voting session is ongoing or finished, and voting results are available, these become available on the right side of the Operator Application where you normally find the speaker and request list.
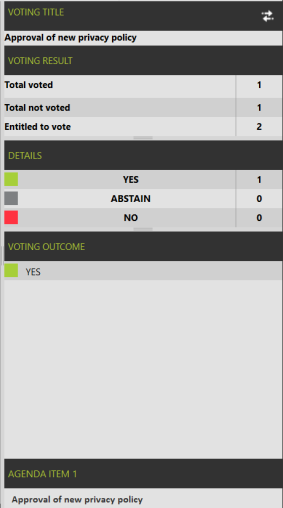
Figure 1-35 Operator Application voting result list
Use the button in the top-right corner (

) to switch between voting results view, and speaker list, request list, group list and speech timers.
This voting result table contains the following components:
- Voting title: the title of the agenda item
- Voting summary: the description of the agenda item
- Voting result: three statistics about the number of participating delegates in the voting session:
- Total voted: the total number of delegates who voted
- Total not voted: the total number of delegates who did not vote
- Entitled to vote: the number of delegates (and their weight) who are entitled to vote in this voting session. See "Configure voting agenda items" on page 1 for more details about voting participation.
- Details: for each of the voting options you can see: their color, description and the number of votes.
- Voting outcome: the voting outcome (if available).
Voting with voting weights
If the voting session has voting weights, these are displayed in the results as fractions. Each of the resulting statistics shows two values: the first number represents the number of delegates; the second number the total of their voting weight.
- Total voted: all delegates who have voted, and their voting weight
- Total not voted: all delegates who have not voted, and their weight
- Entitled to vote: the number of delegates who are entitled to vote in this voting session, and their weight.
The list with all the details always shows the total voting weight of votes that have been cast on each of the options.
Voting result synoptic
The synoptic can show the voting results as shown in the figures below:
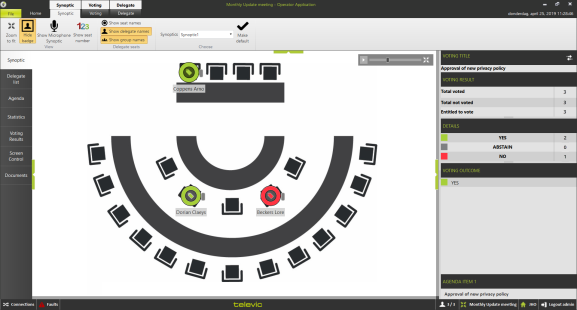
Figure 1-36 Operator Application voting result synoptic
You can switch between this Voting Synoptic and the Microphone Synoptic by clicking the following buttons:
-
 : in the Synoptic ribbon
-
: on the right side of the screen next to the voting title.
The vote synoptic shows the following items:
- The synoptical layout is the same as the one defined in the Room Configurator.
- Microphone icons are replaced by voting icons: the color of the icon represents the voting choice.
- Names and groups are shown depending on the settings in the Synoptic ribbon.
- The color of the group is shown as a full circle around the voting icon.
It is not possible to switch microphones on aor off in the Voting Synoptic; for this function you should switch to the Microphone Synoptic.