
The Delegate view offers you the option to operate the meeting based on the list of delegates. To access this view select Delegate list from the tabs on the left. The Delegate list screen consists of three parts:
Figure 1-37 Operator Application delegate list
The color and symbols are the same as in the synoptic view: red for active microphone, green for a microphone in request. You can also click on a microphone symbol to turn it on or off . Additionally by right-clicking on the microphone symbol, an additional menu appears where you can switch on the microphone, or put the microphone in request. Other options are available, for more information see "Synoptic view" on page 1. The color arch under the microphone symbol indicates to which group the delegate belongs.
When an individual speech timer is specified for a delegate, a timer symbol appears before the delegate seat icon. When a group speech timer is specified, then the same symbol also appears under the group name the delegates belongs to .
In the delegate view, you have two modes: Operator and Edit mode.
To access the Edit mode click the Edit button in the Delegate ribbon. In Edit mode you can have two tabs available:

Figure 1-38 Synoptic view in the Operator application Edit mode
Click Operator in the ribbon to go back to the operator and control the meeting while saving the changes.
If you click the button Authority Overview ![]() in the ribbon, you can see the authorities that are active in the current meeting. For a full description of authorities and how to define them before the meeting, see "Authority" on page 1. Here you can see the authorities that are present in the current meeting. The following columns are displayed:
in the ribbon, you can see the authorities that are active in the current meeting. For a full description of authorities and how to define them before the meeting, see "Authority" on page 1. Here you can see the authorities that are present in the current meeting. The following columns are displayed:
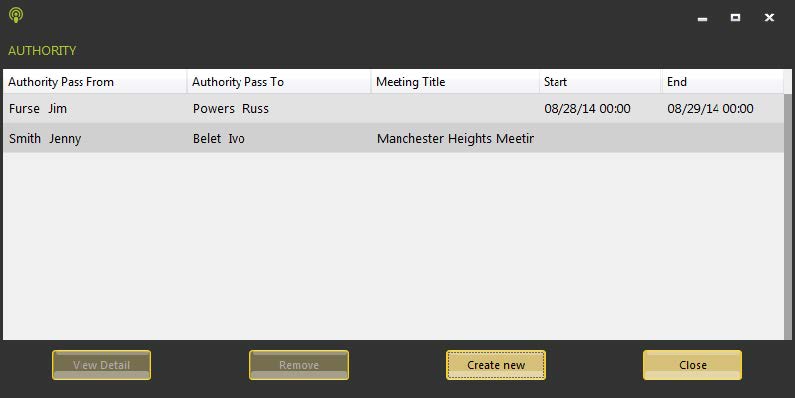
Figure 1-39 Authority Overview window
The following actions are available:
To view additional information about the delegates taking part in the meeting, select Delegates in the meeting ![]() in the ribbon. Here you can find the following information:
in the ribbon. Here you can find the following information:
In this window you can also change the password of the selected delegate by clicking Change password.
If you click Print delegates, this generates a printout of the current present delegates whose badge is inserted at that moment. This does not take into account the delegates that have inserted their badge at one time but only who is currently present.
The Speech Time ribbon is available when you select the Delegate list tab. The functions available here are very similar to the ones described in the Meeting Manager, see "Configure speech timers" on page 1.

Figure 1-40 Speech Time ribbon
The left side of the ribbon shows the Delegate specific speech timer. The actions you perform here apply to the delegates that you select in the delegates list. By pressing CTRL you can select multiple delegates. If you specify the timer for individual delegates, then a symbol appears next to their seat icon.
The right side of the ribbon shows the Group specific speech time. When a delegate that is member of a certain group is selected, that group name appears in the Group list. Applying changes to that timer has consequences for the whole group. When you enable a speech timer for a group, an icon appears under the group name.